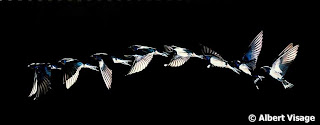
- On my blog I have an animation video, to achieve this I planned a journey and while I walked the journey I took a photo every time I stepped.
- To create animation like I did I just consistently took photos of every movement
- then I put them together using a movie maker programme and sped up the time on each photo to make it look like it was a video which was actually my animation.
Monday, 30 September 2013
Techniques - Animation
Techniques - Multiple Imagery
- This can be done either outside or in the studio, firstly format the camera.
- focusing on one subject take a range of shots of this subject (close up shots work better)
- On Photoshop put all the images of the one subject together to create the original subject but in different part. (the parts do not have to match up)
Techniques - Overlay
- Firstly you need to shoot a range of pictures, a few of textures, e.g. a brick wall, and a few portrait photos (they both work better if the whole frame is filled)
- In Photoshop place one image on top of the other and change the opacity depending on how much you want the image to show.
- Using the rubber tool rub out part of the second layer so you can create a pattern on the model face or vise versa.
Techniques - Multiple Exposure
- turn the camera onto P exposure and make sure the camera is set to multiple exposure which can be found in the menu on the camera.
- start by taking pictures and clicking next when you are happy with the picture, it will gradually build up onto the same photo.
Techniques - Multiple Flash
- Multiple flash must be done in the studio on a black or dark background otherwise it doesn't work as well.
- Focus the camera with all the lights on.
- alter the cameras shutter speed on the wheel to B.
- Turn all the light off so the room is in complete darkness
- hold down the camera shot button and click the flash button each time your model moves so you can capture the model each time they move.
Techniques - Blurring
- Firstly you must adjust the camera's shutter speed by lowering it in order to capture the movement.
- you must have the modelling light on and the red light so you have a continuous light source otherwise the technique will not work.
- make sure you use a polystyrene board to protect that background from the light so the light doesn't effect the background of the picture.
Wednesday, 25 September 2013
Work Diary For Multiple Flash
Evaluation
These two images are what I
achieved from my shoot multiple imagery. I used two different coloured
backgrounds so I could see two different effects, I found that multiple imagery
seemed to work better on a black background as it was more clear with the
movement of the person, where as on the white background the person faded as
they moved each time which you can see from my photo. I do however like the
image on the white background as I though it looked effective with the faded
outline of the person, this was my favorite image on the white background. Next
time I would like to plan my shoot better by making my model use props and
perform different moves to get a range of photos.
How i could use this
This technique could be used
in my personal project as I could use it within my sub topics being animals and
fashion etc. this would make my photos look more effective and also demonstrate
my knowledge of this technique while also making it more interesting and whorthwile.
Thursday, 19 September 2013
Image Bank - Blur
These photos above represent the technique blur, this is when the shutter speed is set low and the camera catches movement within the photo making the movement blur. the technique blur can be done on anything as long as the shutter speed is low, therefore I think the technique is good because it and I think it would be good for me to use this in my personal project. When I experimented with the blur technique I only done it in the studio and I found it worked better on a black background, however I would like to try outside this technique.
Work Diary- Overlay
Evaluation
Today i completed the technique of overlay, we went out in groups and took pictures of different textures and then portrait pictures of people faces. Then on photo shop we put one image on top of the other and change the opacity and rubbed out the parts we didn't want. the two pictures above are two pictures which i achieved from the shoot. i especially like the bottom image of the model on the stones background, i think it looks effective because it looks like she is somewhere like at the beach. i also like the top image because it is different but i still think it looks effective and overall i enjoyed doing this technique.
How i can use this in my personal project
I could use this technique within my personal project as i could portray commercial photography with a twist, for example i could take picture of a building and then i could take another picture of say water and the have the building so its floating on water.
Monday, 16 September 2013
Image Bank For Multiple Flash
Image Bank For Multiple Flash
All these images represent the technique for multiple flash. the technique for multiple flash is when you place the camera on a tripod, you turn off the model light in order to use trigger for when you want the camera to flash and take the picture. in order for this technique to work you need to ensure the object you are using or the model you are using moves so that you get a range of things happening within the photo like seen above. i like the image of the juggling balls because i think it looks very effective, i think this is due to the black background and i like the fact that there are various amounts of hands within the photo as this makes it seem very interesting. i also like the picture of the guy doing the cartwheel, this is somehting i would like to try myself as i think it would turn out good.
Thursday, 12 September 2013
Work Diary Multiple Exposure
Evaluation
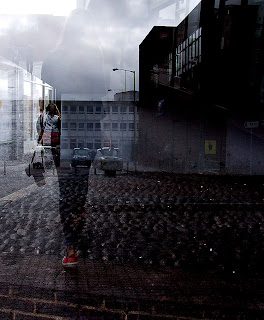
These are two of the photos which i took today during my multiple exposure shoot, i thought these two pictures were good as they both show different things. i like the photo on the right because it shows the town and a person and i think the photo looks quite mysterious as the colour goes form dark to light which i like. the photo on the left is effective because i like how the arrow looks like its sitting on top of the daisys. i also like the contrast of dark and light in this photo and i think both the arrow and the daisys blend well together. my favourite photo out of the two is the on of the right and this is because of the lighting which i think makes the photo look very interesting. however to make it better i could have positioned her more to the left as this way she would have looked bigger than the building and it would have blended together better.

How i could use this
I could use this technique because my personal project is based around marketing and advertising, therefore i could use multiple exposure to make my photos look more appealing and to my audiences. i think this technique would come in handy because it will enable me to included a range of photos in one and this will be helpful when doing my topic as it means i can plan a range of shoots with different ideas. The photo below shows how multiple exposure can be used within my topic because the multiple exposure has made it look more interesting and worthwhile to look at. therefore this technique would be used in marketing.
Image Bank Multiple Exposure
These images all represent multiple
exposure because they contain multiple photos within the photo. Multiple
exposure is a technique in which you take two or more photos and then they
combine together using the multiple exposure technique. My favorite two images
are off the hand and flowers and they woman in the leaves. I like the picture
of the hand because it looks effective against the flowers and also I like the
fact there are clouds in the photo because they make the photo seem calm. The
photo of the woman looks effective because I think she stands out form the rest
of the photo against the trees and the sky.
Monday, 9 September 2013
Project Proposal
For my unit three project I would like to study
commercial photography as I like how broad the subject is and this will enable
me to come up with a range of ideas for different shoots. Some ideas which I
have already for this subject is fashion, equine, food and landscapes. These
ideas are very broad which will give me different options to choose from which
means I wont be stuck for ideas.
The techniques that I would like to use are stop
motion, multiple flash and ring flash. By using these techniques I will be able
achieve a range of high quality photos, which will help me achieve my grade. I will be doing location and studio shoots,
some locations I have thought about are brick lane, and some areas around where
I live because they have a nice set out.
Subscribe to:
Comments (Atom)


